Friday, January 15, 2016

A simple config dialogue box in C#.

As a developer, I often encounter situations where I need to get configuration values from the user. These values range from actual config file values to test configuration values, and for the most part I don't require a very extensive interface to collect them with.

I put together a very simple control that will take any number of configuration key,value pairs as input. It will display them in a list, allow the user to change what they wish and submit the modified values back to the client.


The form is very simple, it contains a layout panel, two labels and two buttons.

To use it, you simply build up a Dictionary with the values you want to give the user the opportunity to modify:


The table layout panel handles adding vertical scroll bars if necessary. It also handles adding rows and figuring out borders, blah blah.


So there you go! A very simple control to allow a user to modify any name/value pairs of data.


Here are the file contents.

SimpleConfigurationControl.Designer.cs

using System.Windows.Forms;

namespace SimpleConfigurationControl
{
    partial class SimpleConfiguration
    {
        ///
        /// Required designer variable.
        ///
        private System.ComponentModel.IContainer components = null;

        ///
        /// Clean up any resources being used.
        ///
        /// true if managed resources should be disposed; otherwise, false.
        protected override void Dispose(bool disposing)
        {
            if (disposing && (components != null))
            {
                components.Dispose();
            }
            base.Dispose(disposing);
        }

        #region Windows Form Designer generated code

        ///
        /// Required method for Designer support - do not modify
        /// the contents of this method with the code editor.
        ///
        private void InitializeComponent()
        {
            this.btnSave = new System.Windows.Forms.Button();
            this.btnCancel = new System.Windows.Forms.Button();
            this.tableLayoutPanel = new System.Windows.Forms.TableLayoutPanel();
            this.lblConfigKey = new System.Windows.Forms.Label();
            this.lblConfigVal = new System.Windows.Forms.Label();
            this.SuspendLayout();
            //
            // btnSave
            //
            this.btnSave.Location = new System.Drawing.Point(546, 400);
            this.btnSave.Name = "btnSave";
            this.btnSave.Size = new System.Drawing.Size(75, 23);
            this.btnSave.TabIndex = 5;
            this.btnSave.Text = "Save";
            this.btnSave.UseVisualStyleBackColor = true;
            this.btnSave.Click += new System.EventHandler(this.btnSave_Click);
            //
            // btnCancel
            //
            this.btnCancel.Location = new System.Drawing.Point(13, 400);
            this.btnCancel.Name = "btnCancel";
            this.btnCancel.Size = new System.Drawing.Size(75, 23);
            this.btnCancel.TabIndex = 4;
            this.btnCancel.Text = "Cancel";
            this.btnCancel.UseVisualStyleBackColor = true;
            this.btnCancel.Click += new System.EventHandler(this.btnCancel_Click);
            //
            // tableLayoutPanel
            //
            this.tableLayoutPanel.Anchor = System.Windows.Forms.AnchorStyles.None;
            this.tableLayoutPanel.AutoScroll = true;
            this.tableLayoutPanel.ColumnCount = 2;
            this.tableLayoutPanel.ColumnStyles.Add(new System.Windows.Forms.ColumnStyle(System.Windows.Forms.SizeType.Percent, 45F));
            this.tableLayoutPanel.ColumnStyles.Add(new System.Windows.Forms.ColumnStyle(System.Windows.Forms.SizeType.Percent, 45F));
            this.tableLayoutPanel.Location = new System.Drawing.Point(13, 61);
            this.tableLayoutPanel.Name = "tableLayoutPanel";
            this.tableLayoutPanel.RowCount = 2;
            this.tableLayoutPanel.RowStyles.Add(new System.Windows.Forms.RowStyle(System.Windows.Forms.SizeType.Absolute, 20F));
            this.tableLayoutPanel.RowStyles.Add(new System.Windows.Forms.RowStyle(System.Windows.Forms.SizeType.Absolute, 20F));
            this.tableLayoutPanel.Size = new System.Drawing.Size(608, 333);
            this.tableLayoutPanel.TabIndex = 6;
            //
            // lblConfigKey
            //
            this.lblConfigKey.AutoSize = true;
            this.lblConfigKey.Font = new System.Drawing.Font("Microsoft Sans Serif", 10F, System.Drawing.FontStyle.Regular, System.Drawing.GraphicsUnit.Point, ((byte)(0)));
            this.lblConfigKey.Location = new System.Drawing.Point(12, 25);
            this.lblConfigKey.Name = "lblConfigKey";
            this.lblConfigKey.Size = new System.Drawing.Size(141, 20);
            this.lblConfigKey.TabIndex = 7;
            this.lblConfigKey.Text = "Configuration Key";
            //
            // lblConfigVal
            //
            this.lblConfigVal.AutoSize = true;
            this.lblConfigVal.Font = new System.Drawing.Font("Microsoft Sans Serif", 10F, System.Drawing.FontStyle.Regular, System.Drawing.GraphicsUnit.Point, ((byte)(0)));
            this.lblConfigVal.Location = new System.Drawing.Point(328, 24);
            this.lblConfigVal.Name = "lblConfigVal";
            this.lblConfigVal.Size = new System.Drawing.Size(155, 20);
            this.lblConfigVal.TabIndex = 8;
            this.lblConfigVal.Text = "Configuration Value";
            //
            // SimpleConfiguration
            //
            this.AutoScaleDimensions = new System.Drawing.SizeF(6F, 13F);
            this.AutoScaleMode = System.Windows.Forms.AutoScaleMode.Font;
            this.ClientSize = new System.Drawing.Size(633, 446);
            this.Controls.Add(this.lblConfigVal);
            this.Controls.Add(this.lblConfigKey);
            this.Controls.Add(this.btnSave);
            this.Controls.Add(this.btnCancel);
            this.Controls.Add(this.tableLayoutPanel);
            this.MaximizeBox = false;
            this.MinimizeBox = false;
            this.Name = "SimpleConfiguration";
            this.Text = "SimpleConfiguration";
            this.TopMost = true;
            this.ResumeLayout(false);
            this.PerformLayout();

        }

        #endregion

        private System.Windows.Forms.Button btnSave;
        private System.Windows.Forms.Button btnCancel;
        private System.Windows.Forms.TableLayoutPanel tableLayoutPanel;
        private Label lblConfigKey;
        private Label lblConfigVal;
    }
}


SimpleConfigurationControl:

using System.Collections.Generic;
using System.Net.Mime;
using System.Windows.Forms;

namespace SimpleConfigurationControl
{
    public partial class SimpleConfiguration : Form
    {

        private Dictionary _configurationValues;

        public Dictionary ConfigurationValues
        {
            get { return _configurationValues; }
            set
            {
                _configurationValues = value;
                DisplayConfigurationValues();
            }
        }

        public SimpleConfiguration()
        {
            InitializeComponent();          
        }
       
        private void DisplayConfigurationValues()
        {
            //get the table width
            var layoutPanelWidth = tableLayoutPanel.Width;
            //subtract a few points for borders etc
            var cellWidth = (layoutPanelWidth/2) - 10;
           
            foreach (var configurationValue in _configurationValues)
            {
                var lbl = new Label()
                {
                    Name = string.Format("{0}{1}", "lbl", configurationValue.Key),
                    Text = configurationValue.Key,
                    Width = cellWidth
                };

                var txtBox = new TextBox()
                {
                    Name = string.Format("{0}{1}", "txt", configurationValue.Key),
                    Text = configurationValue.Value,
                    Width = cellWidth

                };

                tableLayoutPanel.RowCount = tableLayoutPanel.RowCount + 1;
                tableLayoutPanel.RowStyles.Add(new RowStyle(SizeType.Absolute, 45F));
                tableLayoutPanel.Controls.Add(lbl, 0, tableLayoutPanel.RowCount-1);
                tableLayoutPanel.Controls.Add(txtBox, 1, tableLayoutPanel.RowCount - 1);
               
            }
           
        }

        private void btnSave_Click(object sender, System.EventArgs e)
        {
            var returnDictionary = new Dictionary();

            foreach (var configurationValue in _configurationValues)
            {
                var genericTxtBox = Controls.Find("txt" + configurationValue.Key, true);

                foreach (var control in genericTxtBox)
                {
                    if (control is TextBox)
                    {
                        returnDictionary.Add(control.Name.Replace("txt", ""), control.Text);                        
                    }
                }
            }

            _configurationValues = returnDictionary;

            this.DialogResult = DialogResult.OK;
            this.Close();
        }

        private void btnCancel_Click(object sender, System.EventArgs e)
        {
            this.DialogResult = DialogResult.Cancel;
            this.Close();
        }
    }
}


A numeric comparison was attempted on "(TargetPlatformVersion)"

Today I opened a project in Visual Studio 2013 that I was working on when I left the office yesterday. Strangely it wouldn't build today, and while the Build Output window showed that a project failed to build, it would not show me any errors.

After unloading the project and making sure there were no errors in the csproj file, I could not get VS to reload the project.

The error I was getting when it tried was


ergh?

Google found a concise solution here at CodeNutz.

I wanted to preserve the information here for posterity.


For some reason Resharper (which I highly recommend) decides occasionally to freak out. In this instance (I believe) it may have gotten confused by using a custom control. *shrug*

Peace.

Thursday, December 15, 2011

Conditional Inserts in SSIS or Using the Lookup Data Transformation

    I've always wondered how to use SSIS tools to update one table based on values in another. Fortunately (or not), I ran across the opportunity to do this at work. It took me a LOT of research and trial and error to figure out how to do it, and since it was such a struggle for me, I figured that there were other "non-SSIS guru" types out there who would find this information helpful. So without further ado, here is the ever popular step by step tutorial (with pictures) on how to update a table in SSIS based on another tables values.

    Problem: I have two tables, my source table is in Access and my destination table is in SQL Server. I need to add only the records from Access that don't already exists in my SQL server destination table.

    Complaining: (You can skip this part if you want, its my blog so I figured I can grumble a little about the effort it took to figure this out). Initially I tried building a temp dataset and seeing which transformations allowed two input sources. The only ones were the merge tools. So I backed up a minute and did some reading. I found one method that described doing it with a script. I thought that surely there was a strictly SSIS "way" to do it without getting scripting involved so I kept digging. I found another method that used a Merge Join transformation. I figured that this was perfect! I mean, we all know that doing this in straight TSQL would be a very simple thing. So I gave it a shot. Alas *frown*, the Merge Join only allows Left Outer, Full Outer and inner joins. So my data source rows were getting added EVERY time instead of only when they didn't exists. Sooooo, back to research. Finally I found the method I used here, and believe me, the whole time I was constructing the work flow I was questioning how the heck it made any sense. Well, it works, and yes, its freaking odd. *shrug*

    Now the part youre waiting for (are you excited? You should be because this is going to work!).

Step 1.
    Create (drag) a new OLE DB Source onto the design pane and get it wired to the data source that you want to insert FROM. In my case its the Access data source.

You have the option to use a table, view or a SQL Command. In my case I chose to use the SQL Command option and get only the columns that I'm concerned with in order to maximize performance.


Step 2.
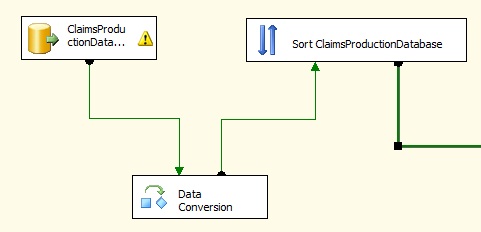
    In my case, I wanted to ensure that the Lookup Transformation later had a value of the correct type and length to use for comparison with my source table. So I added this Data Conversion Transformation to handle 'fixing' the incoming value.


Step 3.
    The Lookup Transformation requires its data source to be sorted. This was easily enough implemented. 

So here is my design pane so far: 


Step 4.
    Here is the part that had me scratching my head and re-reading the posts of those who have suggested using it. The Lookup Data Flow Transformation is described as "Looks up values in a data set by using exact matching". Hmm... OK Well that is certainly what I want to do, look up values in a data set. But how to we get from "look up values in a data set" to "look up values in a data set and then add only ones that aren't there"? It turns out that the Lookup Transformation does "look up values in a data set" and send the matching values down the green leg and the non matches down the red leg. (I know! We are using an 'error' condition to do some desired work for us *shakes head.)  

I added the Lookup Transformation to my design pane and linked it to my Sort Transformation:

And here is how it is configured - the Reference Table is the 'destination'  table.

The Lookup Transformation is 'aware' of the incoming fields from the source, so we link the important one to the important one in our destination.


Then here is the trick, we make it redirect our error rows (the rows that DONT match) to the error output.


So what is happening? The Lookup Transformation attempts to match each row in the source table with each row in the destination, each one that doesn't match gets redirected out to the error leg. Which is exactly what we want, it just makes no sense that we get it this way.


Step 5.
  Plug the error leg of the Lookup Transformation to our data destination and were done!


There you go! 

Monday, March 16, 2009

On the Separation of Form and Data.

Source code for this article can be downloaded here: http://www.mediafire.com/?mdqmymgrwky

As a professional developer I spend a lot of time maintaining other peoples code. One application that I spend a lot of time with is a C# application written by COBOL programmers. This makes for some very interesting contrasts between what Object Oriented programming is, and how it is simulated by developers without practical experience in OOP.
The forms in this application are a strange mixture of form elements, control logic, static data and business logic. Pieces of the process consists of forms being populated, stored in memory, then passed to other forms for other parts of the process. Maintenance is very difficult, it is hard to determine exactly where values are collected, which form to collect values from and whether data resides in a form or in a large object in memory. There has to be a better way to do this.

Lets lay out the problem formally. We have a process, lets call it OrderALetter. In order to complete one iteration of this process, we must;
1 - Establish a letter recipient.
2- Offer the user a chance to modify any of the information.
4 - Offer the user a form to type the letter into.
5 - Store the letter order.

Based on these abbreviated requirements, we can see that we need 2 forms to collect information, lets call them LetterRecipient and LetterText.
The process we will implement will follow the same order as the problem statement.

Since we are going to be using reflection and iteration to bind our object to our form, this frees us to focus our design cycles on the types we will use. This methodology also forces us to consider a part of OO design that we normally reserve for developing our interfaces; public attributes.

The utility class we will use will reflect on the object and seek properties that match the id's of controls on the form, so we really need to make good decisions regarding the public interface of our object. We need to be careful not to expose any properties that we are not prepared to validate, and we must insure that changes made to the type's attributes cascade properly to keep the type's internals synchronized. If you are smart about your design, this will also help you keep the private members and public methods in your types to the absolute minimum necessary to do the job. This will keep you from racing through objectDesign Mart, filling your object up with all kinds of useless functionality. You will also see very clearly where operations and data stop and where presentation and event handling start. With the types properties you can handle input validation and throw argument errors where validation rules indicate errant data. (This will be handled in a later post).

So lets get started. We need a container class for our customer information, lets call it 'Customers'. The class consist only of the necessary members, associated properties and a validation method or two. Here are the relevant members.
Note: The full source is included, properties, methods etc.

namespace Customers {
public class Customer {

private string _userFirstName;
private string _userLastName;
private string _userMiddleName;
private string _userAddress1;
private string _userAddress2;
private string _userCity;
private string _userState;
private string _userZipCode;
private string _paragraph1;
private string _paragraph2;
}}


Now, lets test this concept. I have created a form consisting of labels and text boxes. There is also a button to bind the control back to the object to update its values, and a button to go to the next step in the process. The text boxes on the form will hold the data from the object and they MUST be named exactly as the associated property in the Customers class is named. Notice what is missing, lots of assignment statements!

Here is the code behind for the form.

namespace Customers{
public partial class LetterOrder : Form{

private Customer _ltrRecipient;
public Customer LetterRecipient
{
get { return this._ltrRecipient; }
set { this._ltrRecipient = value; }
}

public LetterOrder(Customer LetterRecip)
{
InitializeComponent();
this.LetterRecipient = LetterRecip;
FormBinding.BindObjectToControls(LetterRecipient, this);
}

private void button1_Click(object sender, EventArgs e)
{
FormBinding.BindControlsToObject(LetterRecipient, this);
this.Close();
}}}

Notice that we have defined a public property for the Customers object reference. This allows the forms in the application to share the static Customers object.

Here's how the form looks with the data included.

From Mad Bytes


Now we have defined a container class, a form with control id's that mirror property names in the container class, and we have defined operations that bind the object to the control and that bind the control to the object to update values.

Now lets look at the next step. We need to open the LetterText form, populate its values with what the user has already entered and persisted in the Customers object, and get the paragraph text from the user.

using System;
using System.Collections.Generic;
using System.ComponentModel;
using System.Data;
using System.Drawing;
using System.Text;
using System.Windows.Forms;
using Utilities;

namespace Customers{
public partial class LetterOrder : Form{

private Customer _ltrRecipient;
public Customer LetterRecipient
{
get { return this._ltrRecipient; }
set { this._ltrRecipient = value; }
}

public LetterOrder(Customer LetterRecip)
{
InitializeComponent();
this.LetterRecipient = LetterRecip;
FormBinding.BindObjectToControls(LetterRecipient, this);
}

private void button1_Click(object sender, EventArgs e)
{
FormBinding.BindControlsToObject(LetterRecipient, this);
this.Close();
}}}

From Mad Bytes


From this point all we have to do is send the letter to the printing or storage mechanism, preferably as an ILetter.

I have shown you how to completely abstract form data from a form in C#. There are many benefits to this methodology. Implementation of design patterns paradigms allow for easy modifications to the data or the form in the future without breaking anything. Separation of development tasks is much easier as you can establish an interface (the fields available on the form for the object to bind to), and send your winform developers off to build eye popping forms while your data developers build your objects and worry about data validation, serialization, storage etc. Check back for further elocution on this interesting topic.


The helper class used to bind the form to the object and vice versa was taken from an excellent MSDN posting by John Dyer: aspformbinding

I took his version that was written for asp.net and modified it to work with C# winforms.